Navajo Nation
Navajo Nation
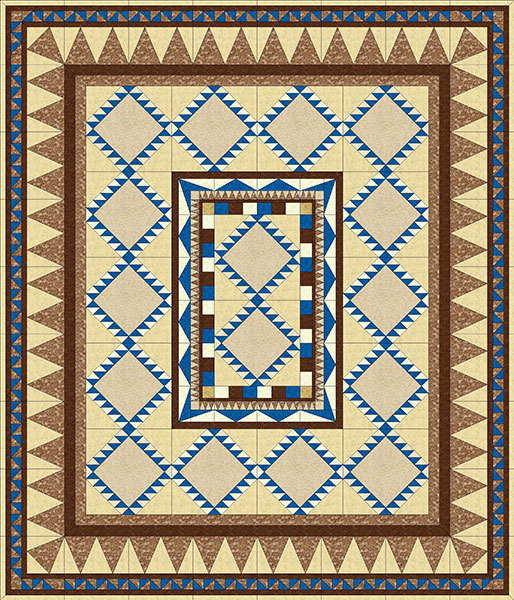
My second original design. I used the quilt-as-you-go approach.
![]()
Fabric Requirements
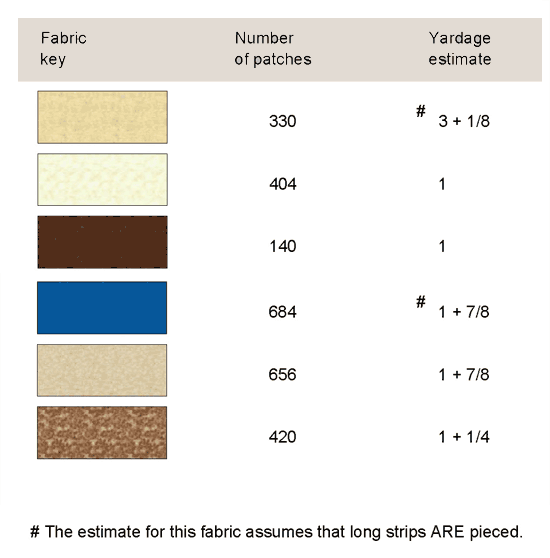
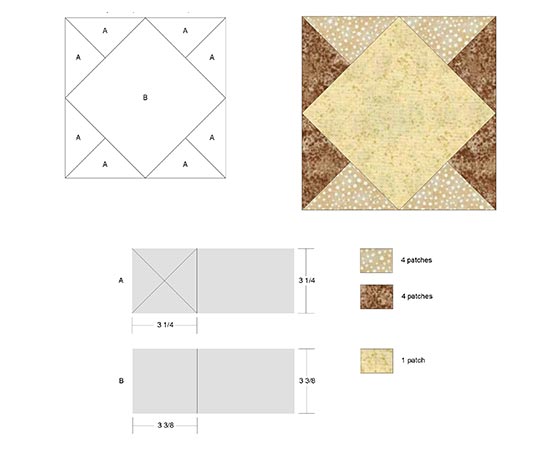
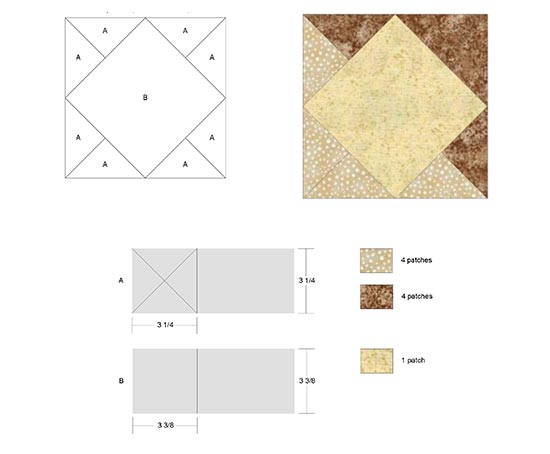
Navajo: make 16 squares
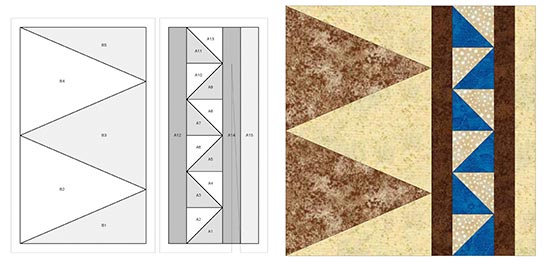
Tramp Art: make 12 squares
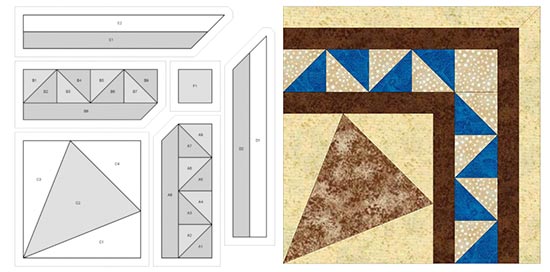
Tramp Art corners: make 4 squares
Sugar Bowl: make 54 squares
Sugar Bowl
corners: make 4 squares
Handkerchief: make 44 squares
Handkerchief corners: make 4 squares

- Center: 2 Navajo blocks
- Assemble 2 Navajo blocks and sew together.
- Round 1: 6-inch wide round with Tramp Art blocks and 1 inch outer fabric strip
- Paper piece 12 Tramp Art blocks and 4 Tramp Art corner blocks.
- Assemble 2 rows of 4 Tramp Art blocks and 2 rows of 2 Tramp Art blocks and 2 corner blocks
- Attach the left/right block (4 Tramp Art block strips) sections to the quilt top first.
- Attach the top/bottom strips to the quilt top.
- Cut 2 strips of fabric 1½ inches wide by 27 inches long and 2 strips of fabric 1½ inches wide by 39 inches long.
- Attach the 27-inch strips to the top and bottom of the quilt top after lining the center of the strips up with the center of the top. You should have 2½ inch tails on each end.
- Line the 39-inch strips to the left and right of the quilt top after lining the center of the strips up with the center of the top. You should have 2½ tails on each end (before attaching to the top and bottom strips. Begin sewing the left and right strips to the top starting just below the top/bottom strips (those will be mitered together.
- To finish the corners, line up the strip tails and sew a diagonal seam from the corner to the opposite edge at a 45 degree angle. Trim excess.
- Round 2: 14 Navajo blocks
- Assemble 2 rows of 3 blocks and 2 rows of 4 blocks.
- Attach the rows of 3 blocks to the left and right sides of the quilt top.
- Attach the rows of 4 blocks to the top and bottom sides of the quilt top.
- Round 3: 54 Sugar Bowl blocks and 4 Sugar Bowl corner blocks
- Assemble 2 rows of 15 Sugar Bowl blocks and 2 rows of 12 Sugar Bowl blocks.
- Attach the rows of 15 blocks to the left and right sides of the quilt top.
- Attach corner blocks to the top/bottom strips.
- Attach the top/bottom strips to the quilt top.
- Cut 4 strips ½ inch wide by 79 inches long of one fabric and 2 strips 1½ inches wide by 79 inches long of second fabric. Attach the ½-inch wide strips to each side of the 1½-inch strips. Attach the 79-inch combination strips to the left and right of the quilt after lining the center of the strips up with the center of the top. You should have 3½-inch tails on each end.
- Cut 4 strips ½ inch wide by 67 inches long of one fabric and 2 strips 1½ inches wide by 67 inches long of second fabric. Attach the ½-inch wide strips to the 1 ½ inch strips. Line the 67-inch combination strips up with the center of the top and bottom of the quilt top. You should 3½-inch tails on each end. Begin sewing the top and bottom strips to the top starting just below the left/right strips (those will be mitered together.
- To finish corners, line up the strip tails and sew a diagonal seam from the corner to the opposite edge of the strip at a 45 degree angle. Trim excess.
- Round 4: 44 Handkerchief squares and 4 Handkerchief corner squares
- Assemble 2 rows of 12 Handkerchief blocks and 2 rows of 10 Handkerchief blocks.
- Attach the rows of 12 blocks to the left and right sides of the quilt top.
- Attach corner blocks to the top/bottom strips.
- Attach the top/bottom strips to the quilt top.
Note: This method of assembling the quilt top is conducive to the quilt-as-you go method of quilt assembling. You can add the batting and backing to each round as you go. Quilt that round then proceed with the next round.
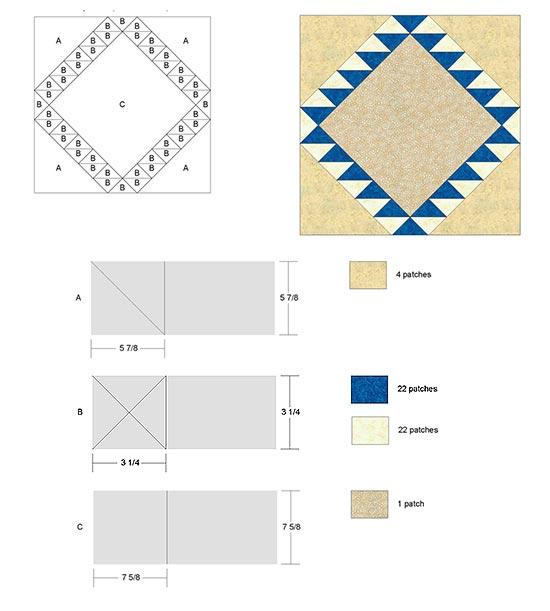
Navajo
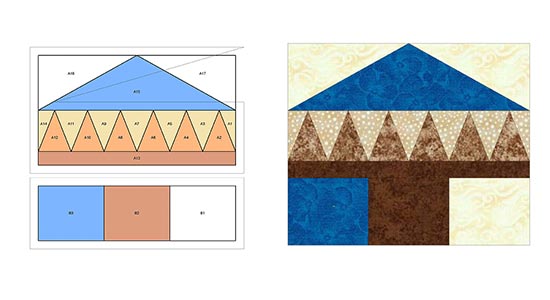
Tramp Art
[Click here for pdf foundation pattern]
Tramp Art Corner
[Click here for pdf foundation pattern]

Sugar Bowl
Sugar Bowl Corner
Handkerchief
[Click here for pdf foundation pattern]
Handkerchief Corner
[Click here for pdf foundation pattern]
[top]