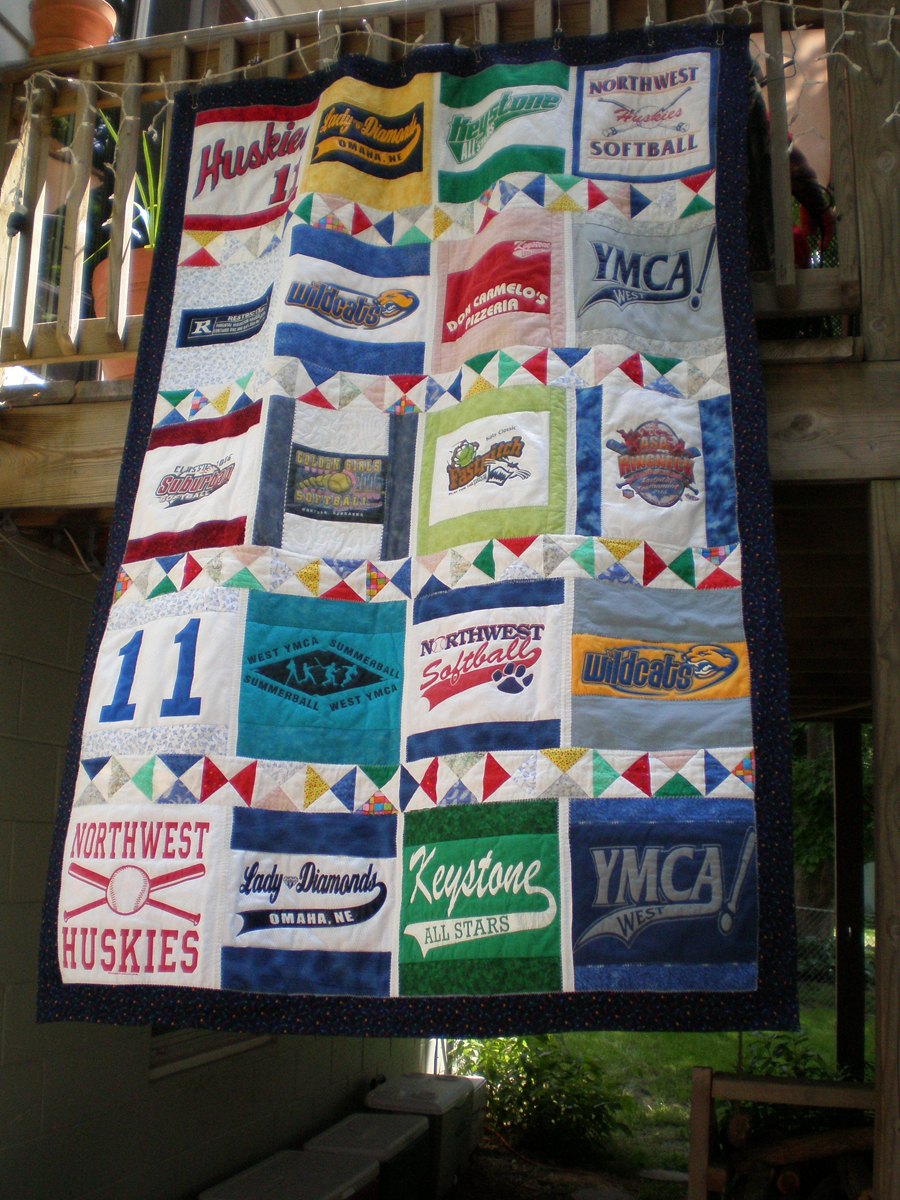
Softball Saga

Linda September 5, 2011 0

Softball Saga

This quilt is made from softball team shirts for my niece's high school graduation.

[img src=http://hobbystash.com/wp-content/flagallery/softball-saga/thumbs/thumbs_img_0629.jpg]Softball Saga – Completed April 2007
My niece graduated from high school in 2007. From grade school through high school she has pitched on various softball teams.
[img src=http://hobbystash.com/wp-content/flagallery/softball-saga/thumbs/thumbs_img_0632.jpg]Softball Saga – Completed April 2007
Her mother wanted to have a memory quilt made using her game shirts.
[img src=http://hobbystash.com/wp-content/flagallery/softball-saga/thumbs/thumbs_img_0634.jpg]Softball Saga – Completed April 2007
During this process I learned T-shirt fabric, even with stiffener is not easy to quilt.
[img src=http://hobbystash.com/wp-content/flagallery/softball-saga/thumbs/thumbs_img_0637.jpg]Softball Saga – Completed April 2007
Half way there
[img src=http://hobbystash.com/wp-content/flagallery/softball-saga/thumbs/thumbs_img_0638.jpg]Softball Saga – Completed April 2007
I decided to make and quilt the individual squares, then piece it all together.
[img src=http://hobbystash.com/wp-content/flagallery/softball-saga/thumbs/thumbs_img_0640.jpg]Softball Saga – Completed April 2007
The back side…used multiple colors for interest.
[img src=http://hobbystash.com/wp-content/flagallery/softball-saga/thumbs/thumbs_img_0641.jpg]Softball Saga – Completed April 2007
The back side….seaming the rows together.
[img src=http://hobbystash.com/wp-content/flagallery/softball-saga/thumbs/thumbs_img_0660.jpg]Softball Saga – Completed April 2007
I used a row of multi-fabric quarter squares to join between rows of teams with plain white strips on the back side.
[img src=http://hobbystash.com/wp-content/flagallery/softball-saga/thumbs/thumbs_img_0661.jpg]Softball Saga – Completed April 2007
[img src=http://hobbystash.com/wp-content/flagallery/softball-saga/thumbs/thumbs_img_0662.jpg]Softball Saga – Completed April 2007
[img src=http://hobbystash.com/wp-content/flagallery/softball-saga/thumbs/thumbs_img_0663.jpg]Softball Saga – Completed April 2007
Sunny picking his favorite team.
[img src=http://hobbystash.com/wp-content/flagallery/softball-saga/thumbs/thumbs_img_0664.jpg]Softball Saga – Completed April 2007
Sunny preparing to test it.
[img src=http://hobbystash.com/wp-content/flagallery/softball-saga/thumbs/thumbs_img_0665.jpg]Softball Saga – Completed April 2007
Sunny very seriously wanting to lay on it.
[img src=http://hobbystash.com/wp-content/flagallery/softball-saga/thumbs/thumbs_img_0659.jpg]Softball Saga – Completed April 2007
I decided a very simple border was needed. I wanted to blend all the different fabric colors but not detract from the individual squares. I ended up choosing the blue over the red fabric.
[img src=http://hobbystash.com/wp-content/flagallery/softball-saga/thumbs/thumbs_img_0735.jpg]Softball Saga – Completed April 2007
Finally..it’s done! Stacy acting as my quality control inspector.
[img src=http://hobbystash.com/wp-content/flagallery/softball-saga/thumbs/thumbs_img_0736.jpg]Softball Saga – Completed April 2007
The end result is nice but I won’t use this process again
[img src=http://hobbystash.com/wp-content/flagallery/softball-saga/thumbs/thumbs_img_0737.jpg]Softball Saga – Completed April 2007
Rosie adds some of her thoughts.
[img src=http://hobbystash.com/wp-content/flagallery/softball-saga/thumbs/thumbs_img_0738.jpg]Softball Saga – Completed April 2007
Traci’s Teams – Completed April 2007.
[img src=http://hobbystash.com/wp-content/flagallery/softball-saga/thumbs/thumbs_img_0739.jpg]Softball Saga – Completed April 2007
The back side.
[img src=http://hobbystash.com/wp-content/flagallery/softball-saga/thumbs/thumbs_p5202476.jpg]Softball Saga – Completed April 2007
Hanging off the back porch at her graduation party!

My niece played softball throughout school. By the time she was a senior, she had accumulated quite a few team shirts. The largest logo determined the size of the squares with the smaller shirts needing filler fabric to make up the difference. I decided I wanted to quilt each square individually before combining into a quilt. This allowed be to outline quilt each logo and had the added affect of stabilizing the jersey fabric. I’m not sure I would have survived trying to stabilize and quilt using the traditional method. There were too many different fabric types and sizes. There were a couple of shirts she couldn’t bear to part with so we took a picture of those logos and used an iron-on process to incorporate them into the quilt. It was fun, interesting, and challenging to make.

Leave A Response »


* Copy this password:

* Type or paste password here:

3,333 Spam Comments Blocked so far by Spam Free Wordpress